
Notice
Recent Posts
Recent Comments
Link
250x250
| 일 | 월 | 화 | 수 | 목 | 금 | 토 |
|---|---|---|---|---|---|---|
| 1 | 2 | 3 | 4 | 5 | 6 | 7 |
| 8 | 9 | 10 | 11 | 12 | 13 | 14 |
| 15 | 16 | 17 | 18 | 19 | 20 | 21 |
| 22 | 23 | 24 | 25 | 26 | 27 | 28 |
| 29 | 30 |
Tags
- REACT
- Docker
- docker network
- java
- jenkins 설치
- grpc
- grafana
- error
- CI/CD
- JavaScript
- Jenkins Pipeline
- jenkins maven
- MongoDB
- Linux
- Spring Boot
- subnetmask
- MySQL
- jpa
- 리액트
- Jenkins
- jenkins github
- 리눅스
- spring
- jenkins install
- nginx
- gradle
- jenkins github 연동
- jenkins jdk
- IntelliJ
- vue.js
Archives
- Today
- Total
뭐든 즐기면서 ;)
Jenkins Github 연동 / Github Jenkins 연동 본문
728x90
1. private 저장소의 경우 token 생성
- github 로그인 후 settings 창 이동
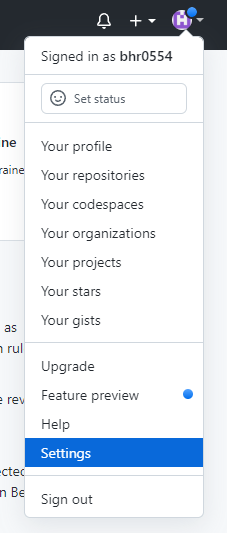
- Developer settings 이동

- Personal access tokens 이동하여 새 token 생성

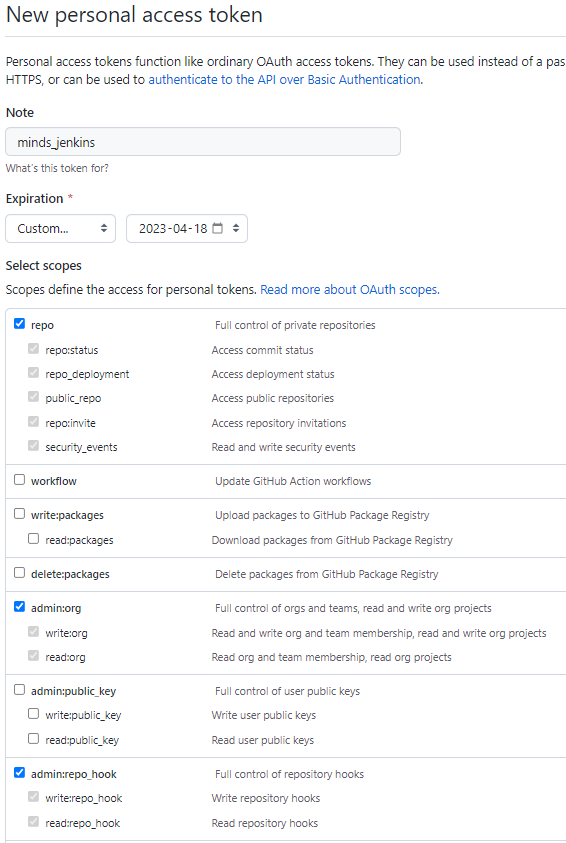
- 생성 완료

2. Credential 생성 (github 연동을 위한 사전 작업)
- Jenkins 관리 > Manage Credentials

- github token credentail 생성 : Jenkins > Global credentials (unrestricted) 드롭다운 || 클릭 > add credentail

- credential 생성 작성하기 : Secret 부분에 token 입력 / ID 아무 식별자 > Creat

- jenkins 관리 > 시스템 설정 > GitHub 영역 이동 > Add GitHub Server 설렉터 클릭 > Github server 선택
- 아래와 같이 화면이 바뀜.
- Name 작성 / Credentails 설렉터는 방금 위에서 생성한 credentail을 선택해 주면 됩니다.
- Test connection > 성공 후엔 + Add 버튼 밑에 아래와 같은 메세지가 노출됩니다.
- Credentials verified for user bhr0554, rate limit: 4999

- 모두 입력 후 저장을 눌러줍니다.
3. Jenkins Item 생성
- 메인 화면 > 새로운 Item
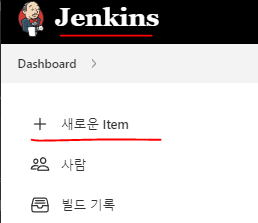
- jenkins 프로젝트 명 입력 / Freestyle project로 생성

- 단순 설명을 작성하는 창이 맨 먼저 보입니다. GitHub project 체크 후 repo url을 입력해 주세요.

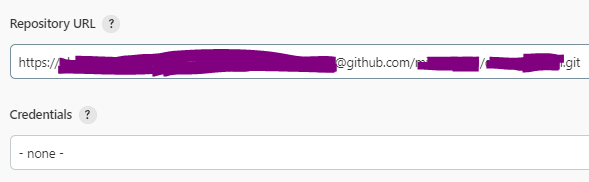
- 중요한 부분은 '소스 코드 관리' > 'Git' 부분입니다.
- Repository URL을 입력해 줍니다.

**Git repository url 접근 방법이 21년에 8월(아마도)에 바뀌었다고 합니다. 해서 기존 original url을 그대로 넣게 되면 아래와 같은 에러가 발생하게 됩니다. 이렇게 된 이후 2번(Credentail 생성)단계는 생략해도 되는 게 아닌가 싶습니다.**
- error 발생
Failed to connect to repository : Command "git ls-remote -h https://github.com/mindslab-ai/data-edit-tool.git HEAD" returned status code 128:
stdout:
stderr: remote: Support for password authentication was removed on August 13, 2021. Please use a personal access token instead.
remote: Please see https://github.blog/2020-12-15-token-authentication-requirements-for-git-operations/ for more information.
fatal: Authentication failed for 'https://github.com/mindslab-ai/data-edit-tool.git/'
- 해결 방법 : https://github.com/sample/sample_repo.git 이와 같던 git url 을 아래와 같이 수정함.
- 수정 : https://위에서 생성한 git token 복사@github.com/sample/sample_repo.git
- Branch Specifier (blank for 'any') : 빌드하기 위한 branch 입력

- item 생성완료
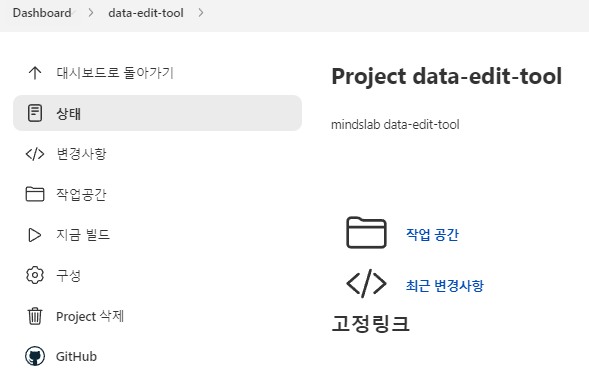
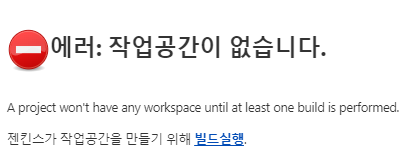
4. Github repository 빌드 (끝 단계)
- 작업 공간을 처음 들어가면 아래와 같은 화면이 뜹니다. > 빌드실행을 클릭해 줍니다.
- 빌드 후 새로고침 하면 아래와 같은 화면이 뜹니다. git repository와 소스 트리가 보입니다.
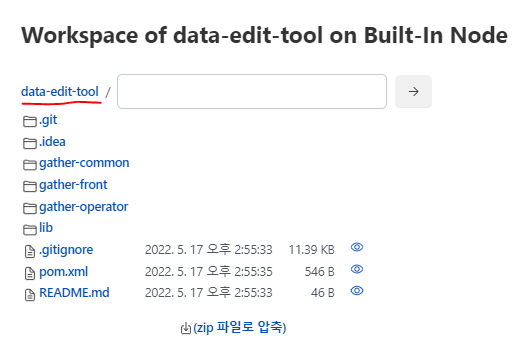
- 이렇게 모든 작업이 완료되었습니다~!~!~!
- 로컬에서 소스를 수정하고 git push하여, jenkins 빌드를 해주시면 jenkins에서도 수정된 소스를 확인할 수 있을 것입니다.
다음 글 : Jenkins Deploy 설정( maven build 후 application tomcat 배포 )
728x90
'서버 > JENKINS' 카테고리의 다른 글
| Jenkins 설치 1 - jenkins package 설치 (0) | 2022.09.30 |
|---|---|
| Jenkins Deploy / Jenkins maven (0) | 2022.05.19 |
| Jenkins pipeline / Jenkins github maven (0) | 2022.05.18 |
| Jenkins install with tomcat/ Jenkins 설치 with tomcat (0) | 2022.05.17 |
| Jenkins install / Jenkins 설치 (0) | 2022.05.16 |
'서버/JENKINS' Related Articles
more


Comments